
Pesach kitchen wisdom: Get kids involved


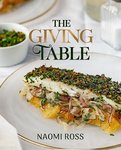
Naomi Ross of Woodmere recently published the acclaimed kosher cookbook, “The Giving Table.”
Folding chairs lined the hallway wall like dutiful soldiers in expectation of arriving guests. Unfamiliar, dusty boxes of pots and china were stacked high, their contents waiting to make their annual appearance on the dining room table.
As a child, the anticipation during those momentous days leading up to Passover was palpable. I couldn’t help but sense the urgency — something big was imminent, and I wanted to be a part of it. Fortunately for me, my mother was adept at putting me to work, getting me involved in the preparations and effectively igniting a spark in her daughter to experience the excitement of the holiday.
As a parent, I’ve realized the mitzvah of educating your children about the story of the Exodus from Egypt begins earlier — not at the seder, but before, in the kitchen.
Kids learn experientially (so do adults). They need to engage all of their senses to internalize a concept or lesson. That’s why we hold up the shank bone, the matzah and the bitter herbs; our seders come complete with props and visual aids.
So, how do we pass on our traditions in a way that is meaningfully relevant to the next generation? It happens first by inviting them to take part in the preparations and the cooking, fostering a feeling of being invested in the holiday experience. That is what makes Passover real for them. The door to meaningful conversations is opened there in the kitchen while peeling apples or rolling matzah balls.
Many jobs are perfect for this purpose and appropriate for a wide range of ages. Here are a few suggestions:
Making charoset: As a child, I thought that making charoset was an all-day process. Peeling, coring and chopping the apples took forever. Chopping nuts in our little manual glass-jar chopper was such hard work for a little one that by the time I finished, I felt as though I were enslaved in Egypt, too! Truth be told, it was the perfect job; it kept me busy for a long time and I felt very accomplished afterward. Come seder night, I was incredibly proud to pass around the charoset I made myself. (Safety Tip: For younger children for whom sharp knives are inappropriate, an old-fashioned hand-held chopper and a large chopping bowl are the way to go.)
Peeling hard-boiled eggs: All kids think this is fun. I have no idea why, but they do. So teach them how and let them at it.
Setting the table: There are many more things to prepare on the seder table than for a regular meal: assembling Haggadahs, pillows for reclining, salt water, and preparing the seder plate all take time. If your children are creative, they can create pretty folded napkins or handmade place cards. Both are fantastic craft projects for artistic kids.
Cooking and baking: For older kids who are able to follow a recipe (or interested in learning), this is a great opportunity to teach your kids basic lessons in cooking and baking. I still remember being called over to help taste and season a simmering dish. And it was in my mother’s kitchen that I learned how to beat egg whites into “stiff peaks” for baking Passover sponge cakes.
No matter how you enlist your children, the real secret to getting them involved is by showing your own interest and excitement. When your kids see you enjoying yourself and getting into the spirit, then they will follow suit and reflect that joy into your home.
Both recipes included here are gluten-free and Passover-friendly.
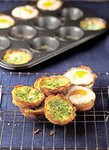
Hash Brown Cups (Dairy or Pareve)
Makes 10 to 12 cups. Prep Time, 15 to 25 minutes. Cook Time, 35 to 40 minutes.
These are the perfect do-ahead hash browns for a brunch, and they can be filled and baked with several variations below. They’re also good as an alternative to fried potato latkes (no frying mess with these) and are perfect for topping. Get creative and vary your toppings — sautéed peppers, smoked salmon, sour cream, etc. (These can be made a day ahead. Refresh uncovered in a hot oven to re-crisp the cups.)
Ingredients:
3 medium potatoes (about 1-1/2 lb.), scrubbed
3 Tbsp. butter or margarine, melted
1 tsp. kosher salt
freshly ground black pepper
Directions:
Preheat oven to 450 degrees. Grease a 12-cup muffin pan liberally with cooking spray.
Bake or microwave potatoes (pierce with a fork first) until mostly cooked through, but still somewhat firm with a bite (about 45 minutes in a 350-degree oven or 5 to 6 minutes in the microwave). They should not be mushy.
Peel the skin off the potatoes. Working over a large mixing bowl, coarsely grate potatoes (a box grater is fine for this). Toss with butter, salt, and pepper.
Carefully line each muffin cup with about 3 to 4 tablespoons of the potatoes, pressing against and up the sides of each cup into an even layer.
Bake for about 20 to 25 minutes, until the potatoes are golden and the edges are crisped. Remove from the oven and allow to cool.
If making one of the variations, continue with the directions below; otherwise, use an offset spatula to carefully remove cups from pan, fill with desired toppings and serve.
Egg-in-a-Nest Variation:
1/2 cup packed grated cheddar cheese
1 dozen eggs
Directions:
Reduce oven temperature to 425 degrees. Divide the shredded cheese and place it in each hash brown cup. Crack each egg and pour it carefully into each cup. Season with salt and pepper.
Bake for about 12 to 15 minutes or until the eggs are just set. Remove from oven. Cool slightly; use an offset spatula to carefully remove from the pan.
Broccoli Quiche Variation:
1/2 cup packed grated cheddar cheese
1 cup frozen chopped broccoli, defrosted and drained
3 eggs
1/3 cup milk
Directions:
Reduce oven temperature to 425 degrees. Divide the shredded cheese among the hash brown cups. Place a few teaspoons of broccoli in each cup (over the cheese).
Beat eggs and milk together; season with salt and pepper. Pour slowly into each cup, being careful to not overfill. Bake for about 15 minutes or until set. Remove from oven. Cool slightly; use an offset spatula to carefully remove cups from the pan.
Short on Time? While I like to use real potatoes for the freshest taste, frozen hash browns can be used instead for a quick shortcut. Simply thaw and press them into the muffin cups.
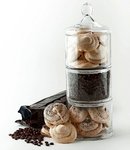
Espresso Meringue Cookies (Pareve)
Makes 18 to 24 cookies. Prep Time, 10 to 15 minutes. Cook Time, 1 hour, plus 1 hour cooling time.
The perfect meringue is crispy on the outside, slightly chewy on the inside. For best results, use fresh, room-temperature egg whites. The proteins in old egg whites may not dry out properly in the oven. To protect the integrity of the meringue, make sure your bowl and beaters are clean and dry. (Use a star tip to pipe decoratively into mounds.)
Ingredients:
4 large egg whites
1/4 tsp. salt
1 cup sugar
1-1/2 Tbsp. instant espresso powder or instant coffee
1 tsp. pure vanilla extract
Coffee beans (optional)
Cocoa for dusting
Directions:
Preheat oven to 250 degrees. Line two baking sheets with parchment paper; set aside.
In a large, clean, dry mixing bowl, beat the egg whites and salt with an electric mixer (fitted with the balloon whisk attachment) on medium speed until the whites are foamy. Increase speed to high, beating until soft peaks form.
Slowly add in the sugar, adding about 2 tablespoons at a time, beating for 15 to 30 seconds after each addition. Add the espresso and vanilla, and continue to beat until the meringue forms very stiff, pillowy, glossy peaks (the mixture should be able to hold a peak up when the beaters are raised).
Working quickly, drop the mixture by large spoonfuls onto the prepared baking sheets, spacing them 1 to 2 inches apart. Top each meringue with an optional coffee bean and dust with cocoa.
Bake for 1 hour or until the surfaces of the meringues feel dry and you can pick one off the parchment without any sticking.
Turn off the oven, prop the door open slightly with the handle of a wooden spoon and allow meringues to cool gently in the oven for 1 hour. Transfer to a serving platter.
Chef’s Touch: Use a star tip to pipe decoratively into mounds.
Variations and Ideas:
•Vanilla Meringue Cookies: Omit espresso powder and replace with 1 teaspoon of vanilla extract.
•Tie-Dye: Transfer meringue into a piping bag. Before sealing, add a few drops of food coloring to the side of the piping bag; do not mix. Colors will spread and swirl as the meringue is piped.
•Mini Pavlovas: Make oversized meringue mounds, making a well in the center (with the back of a spoon). Bake for an additional 15 to 20 minutes. Fill with sweetened whipped cream and top with berries or compote.


